
Introduction
Hi, my name is Kodaloid (Steve), and I started the Xentu project in 2018 as an experiment to see how performant an embedded scripting language could be for writing entire computer games.
Web browsers have the power to enable people to build interactive experiences using popular scripting languages like JavaScript, Lua, Ruby & Python. But they come at the cost of having a big browser attached with all it's system requirements and overheads. I wanted to be able to take that, strip away this big clunky browser, and make it available to run pretty much anywhere natively.
The initial concept used C#, MonoGame and a library called NLua. The bindings turned out to be too slow for modern needs, though it led to a further C++ and native Lua experiment, which was much faster, and spawned the Xentu project as presented today.
What is Xentu?
Xentu is a slim, fast and easy to learn framework for creating 2D computer games scripted in a variety of scripting languages, including JavaScript, Lua and more. It's completely free to use & publish with. It's open-source (under the zlib license), it's written in C/C++, and super cross-platform friendly. Here are some other great features:
- Draw graphics with a fully featured and fast batch renderer.
- Load textures, shaders, fonts, and more using a smart asset manager.
- Access assets from archives via the built in VFS (virtual file system).
- Input support for keyboards, mice and game pads.
- Sound and music playback, with 8 mixer tracks.
-
- much more!
Xentu vs Other Engines
The strength of Xentu is that it offers a modern cross-platform take on a classic native game engine, whilst adding a variety of scripting languages, and emphasis on code performance.
Also by implementing a strict binding API, the engine does a lot of work to make sure the code you write once, will work even when you run it on the mobile, or console versions of the engine.
If you are looking for an engine that removes barriers for sharing your games with people on many different platforms, Xentu has a lot to offer.
System Requirements
Xentu has very minimal system requirements, however there are some. The main requirement is that the device must support OpenGL level 3.3 or higher. This allows the various graphical features to work correctly, such as batch rendering, render targets, blending and shaders.
For context, here are some examples of old devices Xentu will run fine on:
- Late 2012 Mac Mini / MacBook
- PC from 2010 with Nvidia graphics cards NV50 (Tesla+)
- PC from 2007 with AMD graphics cards R600 (Radeon HD 2000+)
There are concrete plans for ports to DirectX 9, 10, Android & iOS next year. And a possible port to Web Assembly. Each will change the minimums slightly and open doors for more devices over time.
About This Documentation
This is a technical documentation for the Xentu game engine project. The main purpose it to provide explanation and guides for how to write game code to work with the engine.
Conventions
The documentation is split up into larger categories to help you understand how the various parts of the game engine work. For example the Asset System section provides techniques on how to load assets into a game.
Sub-headings for these sections are for most part descriptions for the various functions that you can call within your game code. For each function, you'll see a function definition that looks like this:
if (keyboard.key_clicked(KB_ESCAPE)) {
	// do something.
}
if keyboard.key_clicked(KB_ESCAPE) then
-- do something.
endif keyboard.key_clicked(KB_ESCAPE):
# do something.bool result = input.key_clicked(int keycode)
This definition is pseudo-code, and should not be copied as is. It's purpose is to explain how the function should be called. You'll usually also see to the right of the definition an example of how the code definition should be used.
The first part tells you that you should expect a result from the function of type bool (or boolean). Sometimes this part including the = equals symbol is omitted meaning the function does not return any information.
The input.key_clicked is the name of the function, and within the (
round brackets ) you'll optionally see a comma separated list of arguments that
you should pass when calling the function.
Here is a list of types that you'll commonly see in a function definition:
| Type | Description |
|---|---|
| bool | Boolean (true or false) |
| int | Integer (signed +/-), numerical value without floating point. |
| enum | One of several pre-defined values (an integer under the hood). |
| float | Floating point numerical value. |
| double | Double precision floating point numerical value. |
| string | Represents a textual value (sequence of characters). |
| mixed | Means the type can be any of the above. |
| dict | A keyed array/dictionary of informational strings. |
Language & Spelling Notes
This documentation is written in (British) English, however coding convention
for English speaking countries is to use American spellings for certain words.
So in some places you may see substitutions for words like colour to color
to maintain this convention.
Where are the v0.0.1 docs?
The documentation for v0.0.1 docs has been moved to the following URL: https://docs.xentu.net/0.0.1/
It will be kept live indefinitely for historic purposes, however I do not recommend using it as a guide for versions newer than 0.0.1 as the engine was completely rebuilt from the ground up.
Xentu Creator
Xentu Creator is a free, all-in one IDE for creating games with the Xentu game engine.
It has everything you need to get started building games with Xentu. Including a code editor with syntax highlighting. A sprite map editor with animation playback. A conversation editor for dialog prompts, debugging, game publishing and much more.
If you are new to Xentu, this is the best way to get started without hiccups. Give Creator a try today by visiting the download page.
The Basics
How It Works
The Xentu game engine at it's core is a program (or binary) that you run on a computer. If you just run the program, it will start up then close immediately as it does not know what to do. So to make it do something more useful, you need to provide it with some instructions.
When the binary runs, it actually wants to find a file called game.json which
contains the game configuration. The engine uses the built in virtual file system
to find this file, which by default looks in either ./ or ./assets.
This means if you make the binary available via a system environment path, Xentu
will look in the path you are browsing, not the path where the binary is
placed.
This is used extensively in Xentu Creator allowing you to create games without
needing to have multiple copies of the executable.
Game Folder Structure
The most common layout for a game in Xentu looks like this:
| Name | Description |
|---|---|
| /game.json | Your configuration file. |
| /game.js | Your main code file as described by entry_point in game.json (can also be .lua or .py). |
| /textures/ | A folder to place your textures in. |
| /includes/ | A folder to place extra code files. |
You can add many extra code files, however it's important to remember to use the
same code language when you do. Xentu supports 1 coding language per game, which
is decided when your game.json file is first loaded.
The game.json File
Here is an example of a
game.jsonfile.
{
	"game": {
		"title": "Hello World",
		"entry_point": "/game.js",
		"version": "0.0.0",
		"v_sync": true,
		"fullscreen": false,
		"resizable": true,
		"update_frequency": 60,
		"draw_frequency": 60,
		"window": {
			"width": 1280,
			"height": 720
		},
		"viewport": {
			"width": 500,
			"height": 500,
			"mode": 1
		},
		"audio": {
			"frequency": 44100,
			"channels": 2,
			"depth": 16,
			"codecs": ["wav", "ogg", "flac"]
		}
	}
}
On the right you'll see an example of how this game.json file should look.
The main object should always be called game, and the subordinate properties
should follow the pattern you see in the example. Here is a rundown summary on what each property does:
| Property | Description |
|---|---|
| title | The title of your game. |
| entry_point | The file that contains your code, can be of type .js or .lua see the next section Hello World on what code should go in this file. |
| version | The version of your game. |
| v_sync | Whether or not to enable v-sync. |
| fullscreen | Whether or not to start the game in full-screen mode. |
| resizable | Whether or not the window is resizable when not full-screen. |
| update_frequency | Specify how many times a second to call the update event. |
| draw_frequency | Specify a target draw calls per second (0 for unlimited). |
| window | Specifies the size (width and height) of the window to create. |
| viewport | Specifies the size (width and height) of the draw target. |
| audio | Tells the engine what kind of audio to expect. |
Viewport Mode
The viewport property has a third property called mode. This property tells the
engine how to handle a viewport that does not neatly fit into the size of the
window. Here are the options you can give it:
| Mode | Description |
|---|---|
| 0 | Stick to top-left of window (default). |
| 1 | Position centre of the window. |
| 2 | Stretch viewport to size of the window. |
The game window by default is resizable, making this option very important if you have a specific look in mind.
Audio Options
Here is a description of the various audio options that you can specify:
| Property | Description |
|---|---|
| frequency | Specify the audio frequency (default 44100) |
| channels | The number of audio channels, either 1, 2 or 4 (default 2) |
| depth | The bit-depth of the audio, either 8, 16, or 24 (default 16) |
| codecs | Choose which codecs are used. Pick from wav, ogg, flac, mp3, midi or mod (by default only wav is enabled) |
Note that some of these options can reduce performance, and some may not even work on certain devices. Only verge from the defaults if you absolutely sure you know what you are doing.
Hello World
// Source code for game.js

print("Hello from javascript!");

// assets
texture0 = assets.load_texture("/texture0.png");

// variables
renderer.set_background("#444444");

// handle the init event
game.on("init", function() {
	print("Initialized!");
});

// handle the update event
game.on("update", function(dt) {
	if keyboard.key_clicked(KB_ESCAPE) {
		game.exit();
	}
})

// handle the draw event
game.on("draw", function(dt) {
	renderer.clear();
	renderer.begin();
	renderer.draw_texture(texture0, 10, 10, 100, 100);
	renderer.present();
})
-- Source code for game.lua
print("Hello from lua!")
-- assets
texture0 = assets.load_texture("/texture0.png")
-- variables
renderer.set_background("#444444")
-- handle the init event
game.on("init", function()
print("Initialized!")
end)
-- handle the update event
game.on("update", function(dt)
if keyboard.key_clicked(KB_ESCAPE) then
game.exit()
end
end)
-- handle the draw event
game.on("draw", function(dt)
renderer.clear()
renderer.begin()
renderer.draw_texture(texture0, 10, 10, 100, 100)
renderer.present()
end)# Source code for game.py
print("Hello from python!")
# assets
texture0 = assets.load_texture("/texture0.png")
# variables
renderer.set_background("#444444")
# handle the init event
def init():
print("Initialized!")
# handle the update event
def update(dt):
if keyboard.key_clicked(KB_ESCAPE):
game.exit()
# handle the draw event
def draw(dt):
renderer.clear()
renderer.begin()
renderer.draw_texture(texture0, 10, 10, 100, 100)
renderer.present()It's traditional to include a Hello World example, to demonstrate what a basic example of a project looks like, so here is what a basic game would look like written in Xentu.
This example prints the text "Hello from [language]!", loads a texture from an
image file called texture0.png. Then sets the background colour to the HTML
hex code #444444 (dark grey). It also watches for the escape key to be pressed
to exit, and draws the loaded texture at coordinates [10,10,100,100] once per
draw call.
This documentation provides examples for every language supported. Use the tabs at the top right of this website to select the code language you wish to see examples for.
Currently the most popular language for writing games in Xentu is JavaScript. The engine also includes Lua, and Python.
Each of the supported languages have the same features available, though some languages provide their own benefits. For example JavaScript has a more familiar and easy to read syntax, while Lua and Python have shorthand tricks up their sleeve for getting more done with less code.
Events
Xentu uses an event system for communicating engine events to your script code. For example when the engine wants to draw a frame, it sends a "draw" event to your code. If you decide to handle that event, you can define a "callback" function to decide what to draw at that given moment.
A single event can have multiple subscribed callback functions, which can be useful if you wish a chain of things to happen when an event is triggered.
The order in which those callback functions are ran is determined based on the order in which you subscribe to an event.
In this section we'll look at some events that are triggered automatically by the engine.
The init event
// handle the init event
game.on("init", function() {
	print("Initialized!");
});
-- handle the init event
game.on("init", function()
print("Initialized!")
end)# handle the init event
def init():
print("Initialized!")This event fires before any other event is fired, and it indicates that things like timers, assets and the renderer are ready to start.
In the examples above you will see textures are loaded before this is fired, and that is ok, because this event is most useful to indicate readiness, and sometimes you want to wait while things like assets load before starting your own code.
The update event
// handle the update event
game.on("update", function(dt) {
	if keyboard.key_clicked(KB_ESCAPE) {
		game.exit();
	}
})
-- handle the update event
game.on("update", function(dt)
if keyboard.key_clicked(KB_ESCAPE) then
game.exit()
end
end)# handle the update event
def update(dt):
if keyboard.key_clicked(KB_ESCAPE):
game.exit()The update event fires to request game logic from your code. You can specify how
frequently this is called using the update_frequency property in your
game.json.
This event provides a single argument called dt that specifies how much time
(in seconds, with floating point precision) has passed since the last update
event was fired.
The draw event
// handle the draw event
game.on("draw", function(dt) {
	renderer.clear();
	renderer.begin();
	renderer.draw_texture(texture0, 10, 10, 100, 100);
	renderer.present();
})
-- handle the draw event
game.on("draw", function(dt)
renderer.clear()
renderer.begin()
renderer.draw_texture(texture0, 10, 10, 100, 100)
renderer.present()
end)# handle the draw event
def draw(dt):
renderer.clear()
renderer.begin()
renderer.draw_texture(texture0, 10, 10, 100, 100)
renderer.present()The draw event fires when the engine wants to draw a new frame onto the screen.
Like the update event, the draw event can also be controlled in the game.json
file with properties draw_frequency and v_sync.
This event also has a similar argument called dt that indicates how much time
has passed since the last draw event was fired.
Draw Call Order
It is useful to know that renderer.clear() clears the screen. renderer.begin()
begins a new batch of rendering, and renderer.present() sends that batch to the
GPU for drawing.
If you call multiple pairs of begin() and present() calls, you effectively
get the ability to draw layers, which can be very useful when building the visual
hierarchy of your game.
The key_down event
// handle the key_down event
game.on("key_down", function(key_code) {
	print("key down " + key_code.toString());
})
-- handle the key_down event
game.on("key_down", function(key_code)
print("key down " .. key_code)
end)# handle the key_down event
def key_down(key_code):
print("key down " + str(key_code))The key_down event tells you when a key on the keyboard has been pressed. As this is buffered, it is recommended that you use the keyboard.key_down function instead if you need to know immediately when a key is pressed.
The key_click event
// handle the key_down event
game.on("key_click", function(key_code) {
	print("key clicked " + key_code.toString());
})
-- handle the key_down event
game.on("key_click", function(key_code)
print("key clicked " .. key_code)
end)# handle the key_down event
def key_down(key_code):
print("key down " + str(key_code))The key_click event tells you when a key on the keyboard has been clicked (meaning that the key was pressed, then released).
The gamepad_button_down event
// handle the gamepad_button_down event
game.on("gamepad_button_down", function(info) {
	print("gamepad button down " + info);
	// prints something like: 0,0 (device, button)
})
-- handle the gamepad_button_down event
game.on("gamepad_button_down", function(key_code)
print("key clicked " .. info)
-- prints something like: 0,0 (device, button)
end)# handle the gamepad_button_down event
def gamepad_button_down(info):
print("key down " + info)
# prints something like: 0,0 (device, button)The gamepad_button_down event tells you when a gamepad button has been pressed. Current Xentu supports 1 argument per event callback, so the device id and button index are sent as a string separated by a comma.
The window_changed event
// handle the window_changed event
game.on("window_changed", function(event_name) {
	if (event_name == 'size_changed') {
		print("The window has been changed!");
	}
})
-- handle the window_changed event
game.on("window_changed", function(event_name)
if event_name == 'size_changed' then
print("The window has been changed!")
end
end)# handle the window_changed event
def window_changed(event_name):
if event_name == 'size_changed':
print("The window has been changed!")The window_change event fires when something happens to the window containing your game. Here is a list of the various event names that can be passed to your callback:
| Event | Description |
|---|---|
| size_changed | When the window size changes. |
| shown | The window is shown to the user. |
| hidden | The window is hidden. |
| moved | The window has been moved. |
| minimized | The window is minimized. |
| maximized | The window is maximised. |
| restored | The window is restored from a maximised or minimised state. |
| enter | The mouse has entered. |
| leave | The mouse has left. |
| focus | The window has gained keyboard focus. |
| blur | The window has lost keyboard focus. |
Custom Events
The code below should output to the console "my_event was triggered!"
// handle the custom event.
game.on("my_event", function(arg0) {
	print(arg0);
});

// trigger an event.
game.trigger("my_event", "my_event was triggered!");
-- handle the custom event.
game.on("my_event", function(arg0)
print(arg0)
end)
-- trigger an event.
game.trigger("my_event", "my_event was triggered!")# implement event handler.
def my_event_handler(arg0):
print(arg0)
# hook custom event handler.
game.on("my_event", "my_event_handler")
# trigger an event.
game.trigger("my_event", "my_event was triggered!")Events can be a great way of routing game logic, so Xentu allows you to create and subscribe to custom events just like you saw above.
Python is the main outlier here, as you need to define a function before you can
use game.on(event, callback).
Global Functions
There are some functions that Xentu needs to provide, and make accessible anywhere in your code. So in this section we will go over what they are.
Some functions have already been explained above in the custom events section, so they will be omitted here.
game.exit()
game.exit();game.exit()game.exit()Calling this function immediately closes the game, cleaning up used resources before hand.
include(path)
include("/includes/other.js");include("/includes/other.lua")
-- can also load compiled lua files.
include("/includes/other.luac")include("/includes/other.py")The include function uses the virtual file system to load code from another code file, and then executes it within the current context. This is very useful for splitting your game code into smaller organised files.
It's common to confuse this with the native exec() function. The differences depend on language, but the main one is that include() is provided by the engine, while exec() does not use the VFS, and adheres to rules found in the language. For example JavaScript will usually give code ran in exec() it's own context, while include() wont. Exec will usually always returns a result also.
These differences are important to be aware of, as there are valid situations where you may need to use both.
print(args...)
print("Hello World");print("Hello World")print("Hello World")The print global function handles printing information to the console window when debugging. Xentu typically provides binaries in two flavours, with one being for debugging.
For example in Windows, xentu ships as xentu.exe and xentu_debug.exe. If you
use the print() function with the binary ending with _debug in the name, your
text will output, while using the non debug will hide it.
Asset System
Asset loading in Xentu is done via the assets global. In this section we'll
explore how to use the asset system when building games.
Before that, here are some useful tips when using the asset manager:
- Loaders are blocking by nature, so they can hang the game if you try to load a large asset (like some music, text file, or a big texture).
- Most loaders return an integer instead of data, this integer is a throw-away pointer linking to the data to speed up processing.
- Cached data is automatically cleaned up when your game shuts down, however there are methods to do this manually too (prefixed with
unload_).
mount
assets.mount("/second", "/second.zip");

// then mount point is available, and can be used like this:
const id = assets.load_texture("/second/tex01.png");assets.mount("/second", "/second.zip")
-- then mount point is available, and can be used like this:
id = assets.load_texture("/second/tex01.png")assets.mount("/second", "/second.zip")
# then mount point is available, and can be used like this:
id = assets.load_texture("/second/tex01.png")assets.mount(string point, string path)
Xentu has a custom VFS (virtual file system) that allows assets to be loaded traditionally, or from within zip archives.
The way it works is Xentu is aware only of file systems or archives that are
mounted. By default ./ and ./assets are mounted, which is how the engine
can locate game.json.
Here are some rules that should be observed:
- Only files connected to mounts can be loaded.
- Absolute filenames do not work, they are invisible to Xentu.
- First file gets priority when a duplicate exists on multiple mounts.
These rules are a little unusual, however they add several benefits. For example rogue code can not directly access the filesystem without a deliberate mount, mods can be made possible, and packaging your game becomes a lot more straight forward.
read_text_file
const text = assets.read_text_file("/text_file.txt");text = assets.read_text_file("/text_file.txt")text = assets.read_text_file("/text_file.txt")string result = assets.read_text_file(string path)
This method is a reliable way for reading textual source from a file in the VFS, and supports modern text encoding.
A lot of other methods in the engine take advantage of this method. For example,
a good way to load a shader is to read two shader files using this. Then
pass the source code into assets.load_shader(v, s).
The text that is loaded does not get cached, so make sure to store it somewhere as a variable in your game code after calling this.
There is no file type restriction as long as it can be interpreted as a string by the language engine.
load_texture
const texture_id = assets.read_text_file("/textures/example.png");texture_id = assets.read_text_file("/textures/example.png")texture_id = assets.read_text_file("/textures/example.png")int result = assets.load_texture(string path)
Xentu currently uses the SDL_Image library for loading texture data into the engine. This library states that it can load BMP, GIF, JPEG, LBM, PCX, PNG, PNM (PPM/PGM/PBM), QOI, TGA, XCF, XPM, and simple SVG format images.
When calling load_texture, you receive a texture_id that can be used in many of the draw methods explored later in this documentation.
If you are loading in textures for pixel art, you may wish to use Nearest Neighbour interpolation to make sure that textures render correctly when scaled. To do this make sure to call assets.set_interpolation before you load your textures.
load_font
const font_id = assets.load_font("/fonts/arial.ttf", 20);font_id = assets.load_font("/fonts/arial.ttf", 20)font_id = assets.load_font("/fonts/arial.ttf", 20)int result = assets.load_font(string path, int size)
The initial version of this engine had only support for sprite fonts, however Xentu now supports loading of true type font files directly from the VFS.
When you load a font, a size is also requested so that a sprite font can be generated. Due to this, like loading a texture, this loader also gives you an asset id.
load_sound
const sound_id = assets.load_sound("/sounds/fx01.wav");sound_id = assets.load_sound("/sounds/fx01.wav")sound_id = assets.load_sound("/sounds/fx01.wav")int result = assets.load_sound(string path)
The type of audio you can load into your game highly depends on what you've
setup in the game.json file, which is why configuration of that file is so
important.
If for example you set the audio frequency to 48kHz but then load a WAV file that is encoded at 44.1kHz, or you load audio with a different bit depth, you will very likely experience unpredictable behaviour.
Sound files can be in any of the formats you enable in game.json, however they
must be short enough to store as a sample, rather than streamed audio.
load_music
const music_id = assets.load_music("/music/track01.ogg");music_id = assets.load_music("/music/track01.ogg")music_id = assets.load_music("/music/track01.ogg")int result = assets.load_music(string path)
Same rules apply to music as sound loading from above. Make sure to match the
audio settings you specify in game.json and you should be fine.
The main difference between sound files and music, is that music is stored as a stream-able source, and is played over a long period of time, with optimizations to make sure it does not interfere with the visual aspect of the game.
Music files can be in any of the formats you enable in game.json, however they
must be long enough to store as a stream-able source.
load_shader
const shader1_vert = assets.read_text_file("/shaders/shader1.vert");
const shader1_frag = assets.read_text_file("/shaders/shader1.frag");
const shader1_id = assets.load_shader(shader1_vert, shader1_frag);
shader1_vert = assets.read_text_file("/shaders/shader1.vert")
shader1_frag = assets.read_text_file("/shaders/shader1.frag")
shader1_id = assets.load_shader(shader1_vert, shader1_frag)shader1_vert = assets.read_text_file("/shaders/shader1.vert")
shader1_frag = assets.read_text_file("/shaders/shader1.frag")
shader1_id = assets.load_shader(shader1_vert, shader1_frag)Here is what the built in shader looks like:
#version 330

in vec3 i_position;
in vec2 i_texcoord;
in vec4 i_color;
uniform mat4 u_MVP;
out vec2 v_TexCoord;
out vec4 v_Color;
void main()
{
	gl_Position = u_MVP * vec4(i_position, 1.0);
	v_TexCoord = i_texcoord;
	v_Color = i_color;
}

# frag shader

in vec2 v_TexCoord;
in vec4 v_Color;
uniform sampler2D u_Texture;
out vec4 frag_colour;
void main()
{
	vec4 texColor = texture(u_Texture, v_TexCoord);
	frag_colour = texColor * v_Color;
}
int result = assets.load_shader(string vert, string frag)
Xentu currently runs on SDL 2 with OpenGL 3.3 extensions, which means the shaders you can load in should be written in GLSL, and match shader version 330 or higher.
For our purpose, a shader program is made up of two common types. A vertex, and a fragment shader, which need to be compiled into a single program before you can use them.
In the example, you get a shader_id out of the load_shader function which can be used to switch between shader programs during draw calls.
Why use shaders?
There is a limited amount that you can do by just loading in textures into a game. Shaders enable you to add visual modification that would not be possible without them.
A good example might be transitions between scenes with special effects. You could implement basic lighting. Day/night cycle in an RPG, the possibilities are limitless if you put the time in.
Communicating with a shaders
Xentu has special functions for communicating with a shader to pass it extra information. A link will appear here once the documentation for them has been added.
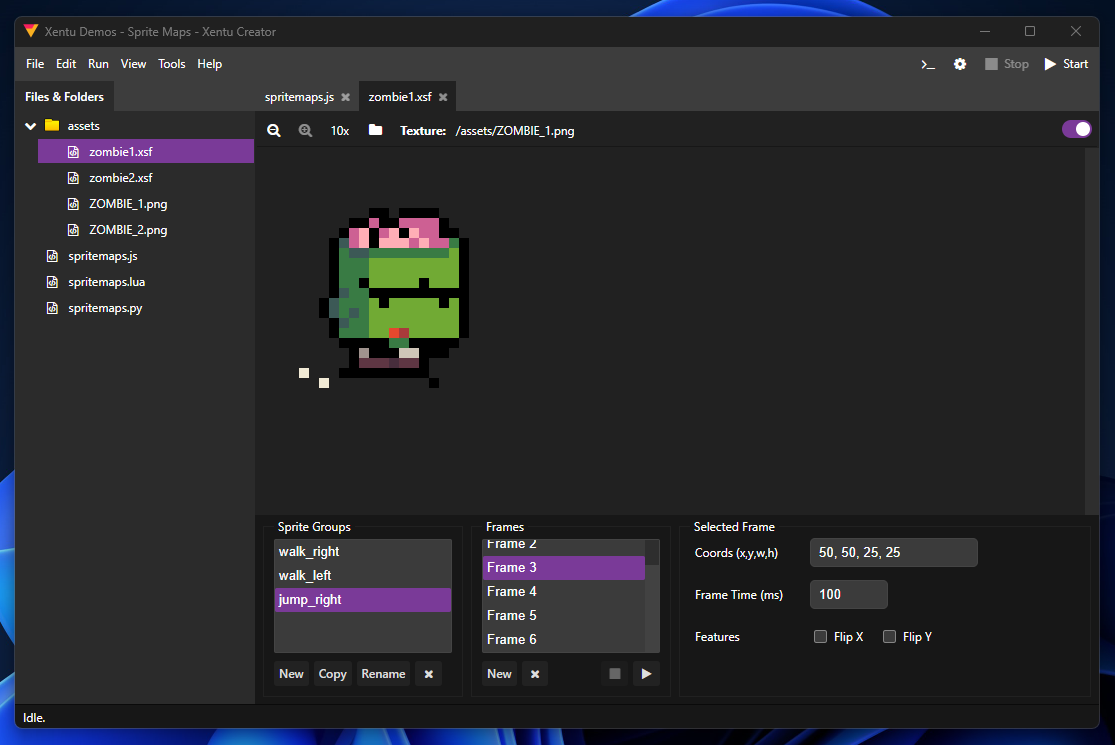
load_sprite_map
const map_id = assets.load_sprite_map("/sprite_maps/map1.xsf");map_id = assets.load_sprite_map("/sprite_maps/map1.xsf")map_id = assets.load_sprite_map("/sprite_maps/map1.xsf")Example of an XSF file:
{
  "image": "/images/ZOMBIE_1.png",
  "animations": [
    {
      "name": "walk_right",
      "frames": [
        { "delay": 100, "coords": "0, 0, 25, 25" },
        { "delay": 100, "coords": "25, 0, 25, 25" },
        { "delay": 100, "coords": "50, 0, 25, 25" },
        { "delay": 100, "coords": "75, 0, 25, 25" }
      ]
    }
  ]
}
int result = assets.load_sprite_map(string path)
XSF Sprite Map's are special JSON formatted files that describe regions and animations that can be found within a texture.
Xentu Creator provides a tool for creating these XSF files, though their composition is very easy to understand.
When an XSF file is loaded using this method, you receive an asset id for the map. Also the texture specified as "image" is loaded behind the scenes in a managed space, where if the sprite map is removed from the asset manager, that underlying image data gets removed as well.
These files are very important when building games, as they allow you to get animation into the game with very little time investment.
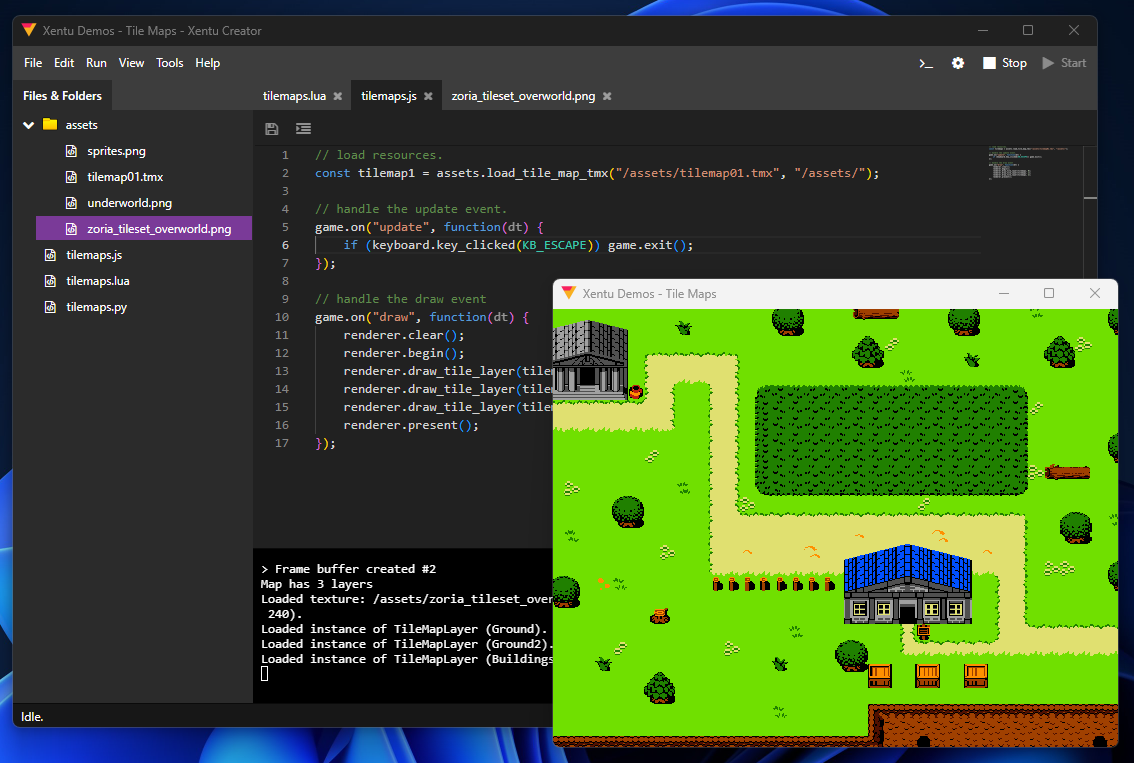
load_tile_map_tmx
const tile_map_id = assets.load_tile_map_tmx("/tile_maps/tile_map1.tmx", "/tile_maps/");tile_map_id = assets.load_tile_map_tmx("/tile_maps/tile_map1.tmx", "/tile_maps/")tile_map_id = assets.load_tile_map_tmx("/tile_maps/tile_map1.tmx", "/tile_maps/")int result = assets.load_tile_map_tmx(string path, string working_dir)
Load a Tiled TMX file, using the parser library
called tmxlite. Then convert it into an internally recognised tile map object.
The converter has some restrictions:
- Supports only orthogonal (right-down) tile layers (isometric will come soon).
- External tile set's are not currently loaded through the VFS, which means if you zip up your assets, you should embed tile set's to make sure they load correctly.
The second argument passed to this function working_dir helps the converter
identify where to locate textures and adjoining files like tile set's. In the
example on the right, the same relative folder path is provided, meaning textures
are likely in the /tile_maps/ folder too (or relative to it).
create_textbox
const textbox_id = assets.create_textbox(300, 90);textbox_id = assets.create_textbox(300, 90)textbox_id = assets.create_textbox(10, 10, 300, 90)int result = assets.create_textbox(float w, float h, [bool wrap])
Drawing text is expensive in computer games. So to mitigate some many of the performance penalties, Xentu uses a system that predefines surfaces on which text can be measured, and drawn.
So to draw text, we first need to create textbox areas using this method. The argument specified remain fixed whilst the textbox exists, however a textbox is affected by global transforms, so you can move, size and rotate in other ways.
unload_texture
assets.unload_texture(texture0);assets.unload_texture(texture0)assets.unload_texture(texture0)assets.unload_texture(int asset_id)
Unload a texture.
unload_font
assets.unload_font(font0);assets.unload_font(font0)assets.unload_font(font0)assets.unload_font(int asset_id)
Unload a font.
unload_sound
assets.unload_sound(sound0);assets.unload_sound(sound0)assets.unload_sound(sound0)assets.unload_sound(int asset_id)
Unload a sound.
unload_music
assets.unload_music(music0);assets.unload_music(music0)assets.unload_music(music0)assets.unload_music(int asset_id)
Unload music.
unload_shader
assets.unload_shader(shader0);assets.unload_shader(shader0)assets.unload_shader(shader0)assets.unload_shader(int asset_id)
Unload a shader.
unload_sprite_map
assets.unload_sprite_map(spriteMap0);assets.unload_sprite_map(spriteMap0)assets.unload_sprite_map(spriteMap0)assets.unload_sprite_map(int asset_id)
Unload a sprite map.
set_wrap
assets.set_wrap(TEX_CLAMP_TO_EDGE);
assets.set_wrap(TEX_CLAMP_TO_EDGE, TEX_CLAMP_TO_EDGE);
assets.set_wrap(TEX_CLAMP_TO_EDGE)
assets.set_wrap(TEX_CLAMP_TO_EDGE, TEX_CLAMP_TO_EDGE)assets.set_wrap(TEX_CLAMP_TO_EDGE)
assets.set_wrap(TEX_CLAMP_TO_EDGE, TEX_CLAMP_TO_EDGE)assets.set_wrap(int wrap_s, [int wrap_t])
Sets the texture wrapping mode when loading a texture. When the second argument is omitted, the first is used for both. The following wrap modes are available:
| Mode | Description |
|---|---|
| TEX_CLAMP_TO_EDGE | The coordinates that fall outside the range will sample from the edge of the texture (default). |
| TEX_CLAMP_TO_BORDER | The coordinates that fall outside the range will be given a specified border colour. |
| TEX_MIRRORED_REPEAT | The texture will repeat, but will mirror when the integer part of the coordinate is odd. |
| TEX_REPEAT | The integer part of the coordinate will be ignored and a repeating pattern is formed. |
set_interpolation
assets.set_interpolation(TEX_LINEAR);
assets.set_interpolation(TEX_LINEAR, TEX_LINEAR);
assets.set_interpolation(TEX_LINEAR)
assets.set_interpolation(TEX_LINEAR, TEX_LINEAR)assets.set_interpolation(TEX_LINEAR)
assets.set_interpolation(TEX_LINEAR, TEX_LINEAR)assets.set_wrap(int min, [int mag])
Sets the texture sampling interpolation mode when loading a texture. When the second argument is omitted, the first is used for both. The following interpolation modes are available:
| Mode | Description |
|---|---|
| TEX_LINEAR | Linear sampling interpolation (can look blurred when scaling) (default). |
| TEX_NEAREST | Nearest Neighbour sampling interpolation (good for pixel art). |
Renderer
The renderer is responsible for drawing graphics onto the screen as fast as possible. To do this, it employs a technique called batch rendering, which groups draw calls by texture, vastly reducing how many instructions have to be sent to the GPU.
Batch rendering can be problematic for drawing layers on top of one another,
so the renderer provides a a way of simulating layers by providing begin()
and present() methods, which can be chained in pairs to get the desired
effect.
The batches drawn by game code are drawn onto the active render target, which is usually the built in fixed size canvas, which then gets drawn onto the screen. This final step allows Xentu to place or scale the canvas on a window based on the viewport mode you specify in your configuration.
clear
renderer.clear();renderer.clear()renderer.clear()renderer.clear()
The clear function clears the currently active render target ready for new drawing. Unless you are doing something custom, this is usually called only once at the beginning of a the draw event callback.
begin
// layer 1
renderer.begin();
renderer.set_position(50, 0);
// your draw calls go here.
renderer.present();

// layer 2.
renderer.begin(false);
// your draw calls go here.
renderer.present();
-- layer 1
renderer.begin()
renderer.set_position(50, 0)
-- your draw calls go here.
renderer.present()
-- layer 2
renderer.begin(false)
-- your draw calls go here.
renderer.present()# layer 1
renderer.begin()
renderer.set_position(50, 0)
# your draw calls go here.
renderer.present()
# layer 2
renderer.begin(false)
# your draw calls go here.
renderer.present()renderer.begin(bool reset)
The begin function begins a new layer of draw calls to execute and draw onto the
currently active render target, this also resets the global transforms if reset
is set to true (true by default). This should be called typically after you call
renderer.clear().
In the example on the right, false is passed to begin to retain the global transforms used in the first draw call.
present
renderer.present()
Once you have called renderer.begin() and sent all of the draw calls for the
layer, you should always finish by calling renderer.present(). This carries out
the draw actions you asked it to, and draws onto the currently active render
target.
draw_texture
renderer.draw_texture(texture_id, 0, 0, 100, 100);renderer.draw_texture(texture_id, 0, 0, 100, 100);renderer.draw_texture(texture_id, 0, 0, 100, 100);renderer.draw_texture(int texture_id, float x, float y, float width, float height)
This function is used to draw an entire texture onto part of the current render target. Dimensions are measured in pixels, and the texture_id can be acquired by using the assets.load_texture method.
The example on the right draws the chosen texture at 0,0. With a width and height of 100 x 100 pixels.
draw_sub_texture
renderer.draw_sub_texture(texture_id, 0, 0, 100, 100, 0, 0, 25, 25);renderer.draw_sub_texture(texture_id, 0, 0, 100, 100, 0, 0, 25, 25)renderer.draw_sub_texture(texture_id, 0, 0, 100, 100, 0, 0, 25, 25)renderer.draw_sub_texture(int texture_id, float dx, float dy, float dw, float dh, float sx, float sy, float sw, float sh)
This function is used to draw part of a texture onto part of the current render target. Dimensions are measured in pixels, and the texture_id can be acquired by using the assets.load_texture method.
Arguments with the prefix "d" (so dx, dy etc...) are for the destination coordinates meaning where on the canvas the pixels will be drawn, and prefix "s" means source coordinates, referring to where on the texture to get pixels from.
draw_rectangle
renderer.draw_rectangle(20, 20, 40, 40);renderer.draw_rectangle(20, 20, 40, 40)renderer.draw_rectangle(20, 20, 40, 40)renderer.draw_rectangle(float float x, float y, float width, float height)
This function draws a coloured rectangle at the given coordinates, based on the colour picked when using the renderer.set_foreground_color function.
draw_textbox
textbox.set_text(textbox_id, "Hello World");

renderer.draw_textbox(textbox_id);
textbox.set_text(textbox_id, "Hello World")
renderer.draw_textbox(textbox_id)textbox.set_text(textbox_id, "Hello World")
renderer.draw_textbox(textbox_id)renderer.draw_textbox(int textbox_id)
This function draws a textbox that has been created using the assets.create_textbox function.
draw_sprite
renderer.draw_sprite(sprite_map_id, "walk_right", 0, 10, 10, 32, 32);renderer.draw_sprite(sprite_map_id, "walk_right", 0, 10, 10, 32, 32)renderer.draw_sprite(sprite_map_id, "walk_right", 0, 10, 10, 32, 32)renderer.draw_sprite(int sprite_map_id, string group, int frame, float x, float y, float w, float h)
This function is similar to the draw_sub_texture in that it draws a part of a
texture onto the screen. However instead of providing the source texture
coordinates, you tell the function which sprite map to look in, which group,
and which frame to get the coordinates (+ some extra info) from.
When used in combination with functions like sprite_map.get_frame_count to get the number of frames available in a given sprite map group, you can easily introduce basic looping animations into your game.
draw_tile_layer
renderer.draw_tile_layer(tile_map_id, 0);renderer.draw_tile_layer(tile_map_id, 0)renderer.draw_tile_layer(tile_map_id, 0)renderer.draw_tile_layer(int tile_map_id, int layer)
This function tells the renderer to draw all tiles for a specific layer of a tile map. It's very common to need to draw things between layers of a tile map, so this makes sure you have the control you need when doing so.
Also there are no options for position when drawing a tile layer, instead you should use the global transform functions such as renderer.set_position to do that.
set_background
renderer.set_background("#000000");renderer.set_background("#000000")renderer.set_background("#000000")renderer.set_background(string hex_color)
This function lets you to set the background colour of the currently active render target. The function expects a string with valid 6 digit HTML formatted hex colour code, with a hash tag prefix. In the future other colour systems will be added, so the hash tag is important.
set_foreground
renderer.set_foreground("#000000");renderer.set_foreground("#000000")renderer.set_foreground("#000000")renderer.set_foreground(string hex_color)
This function sets the foreground drawing colour, which is used by various other
drawing methods, such as draw_rectangle and draw_textbox (as a default if no
text colour is chosen).
The function expects a string with valid 6 digit HTML formatted hex colour code, with a hash tag prefix. In the future other colour systems will be added, so the hash tag is important.
set_window_mode
renderer.set_window_mode(0);renderer.set_window_mode(0)renderer.set_window_mode(0)renderer.set_window_mode(int mode)
This function allows you to set the window mode for the game. Here is a table of the valid window modes available:
| Mode ID | Description |
|---|---|
| 0 | Windowed |
| 1 | Full-screen |
| 2 | Borderless Full-screen |
Further modes will be added in future updates to the engine.
set_position
renderer.set_position(52, 33);renderer.set_position(52, 33)renderer.set_position(52, 33)renderer.set_position(float x, float y)
This function allows you to set the global translation coordinates for drawing.
set_origin
renderer.set_origin(0, 0);renderer.set_origin(0, 0)renderer.set_origin(0, 0)renderer.set_origin(float x, float y)
This function allows you to set the global transform origin coordinates for drawing.
set_rotation
renderer.set_rotation(45);renderer.set_rotation(45)renderer.set_rotation(45)renderer.set_rotation(float angle)
This function allows you to set the global rotation angle (degrees) for drawing,
which pairs well with set_origin.
set_scale
renderer.set_scale(1, 1);renderer.set_scale(1, 1)renderer.set_scale(1, 1)renderer.set_scale(float x, float y)
This function allows you to set the global scale transform for drawing. Setting both x and y to 2 for example would make all graphics you draw twice as big.
set_shader
renderer.set_shader(shader_id);renderer.set_shader(shader_id)renderer.set_shader(shader_id)renderer.set_shader(int shader_id)
This function sets which shader program is currently being used. Passing 0 as the shader_id switches back to the built in shader.
set_alpha
renderer.set_alpha(0.5);renderer.set_alpha(0.5)renderer.set_alpha(0.5)renderer.set_alpha(float alpha)
Sets the alpha channel value (fraction between 0.0 and 1.0) to use when drawing textures (given that blending is enabled, with the correct blend function).
By default the correct blending function is set to enable alpha-blending. However if you change the blend function, the value you set here might have no effect.
set_blend
renderer.set_blend(true);renderer.set_blend(true)renderer.set_blend(true)renderer.set_blend(bool blend)
This function enables or disables the various blending features available in the renderer. By default blending is enabled.
set_blend_func
renderer.set_blend_func(SRC_ALPHA, ONE_MINUS_SRC_ALPHA);renderer.set_blend_func(SRC_ALPHA, ONE_MINUS_SRC_ALPHA)renderer.set_blend_func(SRC_ALPHA, ONE_MINUS_SRC_ALPHA)renderer.set_blend_func(string src_func, string dest_func)
This function specifies the pixel arithmetic for blending graphics together. The
default value for src_func is ONE, and the default value for dest_func is
ZERO. Here is a list of the various constants that can be used with this
function:
| Constant | Description |
|---|---|
| ZERO | |
| ONE | |
| SRC_COLOR | |
| ONE_MINUS_SRC_COLOR | |
| DST_COLOR | |
| ONE_MINUS_DST_COLOR | |
| SRC_ALPHA | |
| ONE_MINUS_SRC_ALPHA | |
| DST_ALPHA | |
| ONE_MINUS_DST_ALPHA | |
| CONSTANT_COLOR | |
| ONE_MINUS_CONSTANT_COLOR | |
| SRC_ALPHA_SATURATE | |
| SRC1_COLOR | |
| ONE_MINUS_SRC1_COLOR | |
| SRC1_ALPHA | |
| ONE_MINUS_SRC1_ALPHA |
set_blend_preset
renderer.set_blend_func(BLEND_MULTIPLY, true);renderer.set_blend_func(BLEND_MULTIPLY, true)renderer.set_blend_func(BLEND_MULTIPLY, true)renderer.set_blend_preset(string preset_name, bool with_alpha)
This function simplifies the blend system by allowing you to specify a blending preset. Web browsers, and photo editing software often offer preset's as they can be easier to understand. Here is a table of all the blend presets available.
| Constant | Description |
|---|---|
| BLEND_SOURCE_OVER | |
| BLEND_SOURCE_IN | |
| BLEND_SOURCE_OUT | |
| BLEND_SOURCE_ATOP | |
| BLEND_DESTINATION_OVER | |
| BLEND_DESTINATION_IN | |
| BLEND_DESTINATION_OUT | |
| BLEND_DESTINATION_ATOP | |
| BLEND_LIGHTER | |
| BLEND_COPY | |
| BLEND_XOR | |
| BLEND_MULTIPLY | |
| BLEND_SCREEN | |
| BLEND_OVERLAY | |
| BLEND_DARKEN | |
| BLEND_LIGHTEN | |
| BLEND_COLOR_DODGE | |
| BLEND_COLOR_BURN | |
| BLEND_HARD_LIGHT | |
| BLEND_SOFT_LIGHT | |
| BLEND_DIFFERENCE | |
| BLEND_EXCLUSION | |
| BLEND_HUE | |
| BLEND_SATURATION | |
| BLEND_COLOR | |
| BLEND_LUMINOSITY |
Sprite Maps
Example of an XSF file:
{
  "image": "/images/ZOMBIE_1.png",
  "animations": [
    {
      "name": "walk_right",
      "frames": [
        { "delay": 100, "coords": "0, 0, 25, 25" },
        { "delay": 100, "coords": "25, 0, 25, 25" },
        { "delay": 100, "coords": "50, 0, 25, 25" },
        { "delay": 100, "coords": "75, 0, 25, 25" }
      ]
    }
  ]
}
Sprite maps allow you to divide a larger image up into identifiable sprite regions (or animations) and frames. This is really useful as sprites can be small, so having a lot on a single texture can be super efficient for drawing lots of graphics at once.
Xentu provides a sprite map file type called XSF written in an easy to understand JSON format.
These XSF files can be loaded through the asset system via the function assets.load_sprite_map, which also conveniently loads the underlying texture, and auto-disposes once finished.
Xentu Creator provides all the tools you need for creating, and testing sprite maps.
get_frame_info
var fi = sprite_map.get_frame_info(sprite_map_id, "walk_right", 0);fi_delay, fi_flip_x, fi_flip_y = sprite_map.get_frame_info(sprite_map_id, "walk_right", 0)fi_delay, fi_flip_x, fi_flip_y = sprite_map.get_frame_info(sprite_map_id, "walk_right", 0)mixed result = sprite_map.get_frame_info(int sprite_map_id, string group, int frame)
This function retrieves information about a frame on a sprite map frame. Info returned includes a delay value for how many milliseconds should be waited until the next frame should be shown in an animation, and two booleans that identify whether a graphic is drawn flipped on the x or y axis.
get_frame_count
var count = sprite_map.get_frame_count(sprite_map_id, "walk_right");count = sprite_map.get_frame_count(sprite_map_id, "walk_right")count = sprite_map.get_frame_count(sprite_map_id, "walk_right")int result = sprite_map.get_frame_count(int sprite_map_id, string group)
This function retrieves the number of frames stored in a sprite map group.
Tile Maps
At the most basic description, a tile map is a system for describing an arranged grid of drawable tiles. It's common for computer games to use this sort of thing, as it provides a convenient and performant way of organising a 2d scene.
Tile maps are also very easy to represent in data, making it possible to store in a computer file ready to be loaded into a game when desired.
Modern tile maps contain far more than just a set of tiles however. For instance a tile map can be split up into a series of layers. For which each can have a extra information, such as a list of polygons, variables, text areas etc...
Due to how integral these sorts of structures can be when creating 2d games, Xentu provides built-in support for them out of the box. Including an asset loader method for the popular TMX tile map file format, a rendering method for drawing layers, and functions for reading and writing to the tile maps you load.
This section describes those functions, and demonstrates how to use them. To see how a tile map can be loaded, please visit the Asset System section. And to see how to draw a tile layer, visit the renderer.draw_tile_layer() section.
get_layer
const layer_info = tile_map.get_layer(tile_map_id, layer_id);layer_info = tile_map.get_layer(tile_map_id, layer_id)layer_info = tile_map.get_layer(tile_map_id, layer_id)dict result = tile_map.get_layer(int tile_map_id, int layer_id)
This function gives you a way to read a collection of property variables for a tile map layer. The first argument is the id of the tile map you loaded, and the layer_id is the numerical index of the layer to retrieve info for.
get_layer_tiles
const tiles = tile_map.get_layer_tiles(tile_map_id, layer_id);tiles = tile_map.get_layer_tiles(tile_map_id, layer_id)tiles = tile_map.get_layer_tiles(tile_map_id, layer_id)array result = tile_map.get_layer_tiles(int tile_map_id, int layer_id)
This function retrieves a raw integer array of tile indices associated with a tile map layer. This can be useful for a number of reasons, however it is not required for just drawing a tile map. For that see the renderer.draw_tile_layer() function.
get_layer_objects
const objects = tile_map.get_layer_objects(tile_map_id, layer_id);objects = tile_map.get_layer_objects(tile_map_id, layer_id)objects = tile_map.get_layer_objects(tile_map_id, layer_id)array result = tile_map.get_layer_objects(int tile_map_id, int layer_id)
This function returns an array of objects associated with a tile layer. Here is a list of built in properties you can expect to see for each object:
| Property Name | Persistence | Description |
|---|---|---|
| id | always | The numeric id of the object. |
| name | always | The name of the object. |
| class | always | Used by some to define extra classification for an object. |
| type | always | The type of object (see below). |
| x | optional | The x coordinate for the object. |
| y | optional | The y coordinate for the object. |
| width | optional | The width of the object. |
| height | optional | The height of the object. |
| visible | optional | Weather the object should be visible. |
| points | optional | Used if type is polygon or point, describes a series of relative 2d point coordinates. |
| text | optional | Text for the object when the type is text. |
| font_family | optional | The name of the font family when the type is 'text'. |
| font_size | optional | The size of the font when the type is 'text'. |
| tile_id | optional | The idx of the tile to draw when the type is 'tile'. |
If optional appears in the persistence column, it means that the field is provided
under a certain condition. An object can be one of the following types (described
by the type property):
| Object Type | Description |
|---|---|
| rectangle | A closed 2-D polygon, having 4 sides, 4 corners, and 4 right angles. |
| point | An individual point in 2d space. |
| ellipse | A closed curve that fills the rectangular area of the object. |
| polygon | A set of relative 2d points, which may make up a closed shape. |
| tile | A single tile that can be drawn individually. |
| text | Represents an area of text. |
get_tile
const tile_info = tile_map.get_tile(tile_map_id, layer_id, tile_id);tile_info = tile_map.get_tile(tile_map_id, layer_id, tile_id)tile_info = tile_map.get_tile(tile_map_id, layer_id, tile_id)dict result = tile_map.get_tile(int tile_map_id, int layer_id, int tile_id)
Gets a keyed array of associated variables for an individual tile.
get_object
const tile_info = tile_map.get_object(tile_map_id, layer_id, object_id);tile_info = tile_map.get_object(tile_map_id, layer_id, object_id)tile_info = tile_map.get_object(tile_map_id, layer_id, object_id)dict result = tile_map.get_object(int tile_map_id, int layer_id, int object_id)
Gets a single object from a tile map layer, see above for a definition of the information you can expect to be returned.
change_layer
tile_map.change_layer(tile_map_id, layer_id, "opacity", 0.4);tile_map.change_layer(tile_map_id, layer_id, "opacity", 0.4)tile_map.change_layer(tile_map_id, layer_id, "opacity", 0.4)tile_map.change_layer(int tile_map_id, int layer_id, string prop, string value)
Use this function to change the property value for a layer.
change_tile
tile_map.change_tile(tile_map_id, layer_id, "name", "New Name");tile_map.change_tile(tile_map_id, layer_id, "opacity", "New Name")tile_map.change_tile(tile_map_id, layer_id, "opacity", "New Name")tile_map.change_tile(int tile_map_id, int layer_id, int tile_id, string prop, string value)
Use this function to change the property value for a tile on a layer.
change_object
tile_map.change_object(tile_map_id, layer_id, object_id, "name", "New Name");tile_map.change_object(tile_map_id, layer_id, object_id, "opacity", "New Name")tile_map.change_object(tile_map_id, layer_id, object_id, "opacity", "New Name")tile_map.change_object(int tile_map_id, int layer_id, int object_id, string prop, string value)
Use this function to change the property value for a tile on a layer. Note that some properties such as id and type are read only and can not be changed.
Textbox
font0 = assets.load_font("/fonts/Roboto-Regular.ttf", 20);
text0 = assets.create_textbox(10, 10, 680, 40);

textbox.set_text(text0, font0, "Hello World");
textbox.set_color(text0, font0, "#FFFF00");

game.on("draw", function(dt) {
	renderer.clear();
	renderer.begin();
	renderer.draw_textbox(text0);
	renderer.present();
});
font0 = assets.load_font("/fonts/Roboto-Regular.ttf", 20)
text0 = assets.create_textbox(10, 10, 680, 40)
textbox.set_text(text0, font0, "Hello World")
textbox.set_color(text0, font0, "#FFFF00")
game.on("draw", function(dt)
renderer.clear();
renderer.begin();
renderer.draw_textbox(text0);
renderer.present();
end)font0 = assets.load_font("/fonts/Roboto-Regular.ttf", 20)
text0 = assets.create_textbox(10, 10, 680, 40)
textbox.set_text(text0, font0, "Hello World")
textbox.set_color(text0, font0, "#FFFF00")
def draw(dt):
renderer.clear()
renderer.begin()
renderer.draw_textbox(text0)
renderer.present()Drawing text is expensive in computer games. So to mitigate some many of the performance penalties, Xentu uses a system that predefines surfaces on which text can be measured, and drawn onto objects called textboxes.
You can create a textbox using the asset system function assets.create_textbox Once you've created a textbox, you can interact with it by using the functions in this section.
On the right is an example of how a textbox is created, then used.
set_text
textbox.set_text(text0, font0, "Hello World");textbox.set_text(text0, font0, "Hello World")textbox.set_text(text0, font0, "Hello World")textbox.set_text(int textbox_id, int font_id, string text)
Sets the text and font that should appear on a textbox when rendered.
set_color
textbox.set_color(text0, font0, "#FFFF00");textbox.set_color(text0, font0, "#FFFF00")textbox.set_color(text0, font0, "#FFFF00")textbox.set_text(int textbox_id, string hex)
Sets the text colour for a textbox when rendered.
measure_text
const result = textbox.measure_text(text0, font0, "Hello World");
// result.x
// result.y
width, height = textbox.measure_text(text0, font0, "Hello World")width, height = textbox.measure_text(text0, font0, "Hello World")mixed result = textbox.measure_text(int textbox_id, int font_id, string text)
Returns the measured dimensions of the text that has been set onto a textbox.
Audio System
Explains how the audio system works in Xentu.
play_sound
audio.play_sound(audio0, -1, 0);audio.play_sound(audio0, -1, 0)audio.play_sound(audio0, -1, 0)audio.play_sound()
play_music
audio.play_music(music0, 0);audio.play_music(music0, 0)audio.play_music(music0, 0)audio.play_music()
stop_sound
audio.stop_sound();audio.stop_sound()audio.stop_sound()audio.stop_sound()
stop_music
audio.stop_music();audio.stop_music()audio.stop_music()audio.stop_music()
set_sound_volume
audio.set_sound_volume(sound0, 0.5);audio.set_sound_volume(sound0, 0.5)audio.set_sound_volume(sound0, 0.5)audio.set_sound_volume(int sound_id, float volume)
set_channel_volume
audio.set_channel_volume(0, 0.5);audio.set_channel_volume(0, 0.5)audio.set_channel_volume(0, 0.5)audio.set_channel_volume(int channel_id, float volume)
set_music_volume
audio.set_music_volume(0.5);audio.set_music_volume(0.5)audio.set_music_volume(0.5)audio.set_music_volume(float volume)
set_channel_panning
audio.set_channel_panning(channel_id, 0, 0);audio.set_channel_panning(channel_id, 0, 0)audio.set_channel_panning(channel_id, 0, 0)audio.set_channel_panning(int channel_id, float left, float left)
Input (Keyboard)
Xentu provides support for various forms of user input via the input global
object. In this section you'll see a breakdown of how to interact with the
keyboard, mouse and a gamepad.
key_down
if (keyboard.key_down(KB_ESCAPE)) {
	// do something.
}
if keyboard.key_down(KB_ESCAPE) then
-- do something.
endif keyboard.key_down(KB_ESCAPE):
# do something.bool result = input.key_down(int keycode)
Detect if a key on the keyboard is pressed down. Here is a list of the available key codes:
| Constants | .. | .. |
|---|---|---|
| KB_SPACE | KB_V | KB_F12 |
| KB_APOSTROPHE | KB_W | KB_F13 |
| KB_COMMA | KB_X | KB_F14 |
| KB_MINUS | KB_Y | KB_F15 |
| KB_PERIOD | KB_Z | KB_F16 |
| KB_SLASH | KB_LEFT_BRACKET | KB_F17 |
| KB_1 | KB_BACKSLASH | KB_F18 |
| KB_2 | KB_RIGHT_BRACKET | KB_F19 |
| KB_3 | KB_GRAVE_ACCENT | KB_F20 |
| KB_4 | KB_ESCAPE | KB_F21 |
| KB_5 | KB_ENTER | KB_F22 |
| KB_6 | KB_TAB | KB_F23 |
| KB_7 | KB_BACKSPACE | KB_F24 |
| KB_8 | KB_INSERT | KB_KP_1 |
| KB_9 | KB_DELETE | KB_KP_2 |
| KB_0 | KB_RIGHT | KB_KP_3 |
| KB_SEMICOLON | KB_LEFT | KB_KP_4 |
| KB_EQUAL | KB_DOWN | KB_KP_5 |
| KB_A | KB_UP | KB_KP_6 |
| KB_B | KB_PAGE_UP | KB_KP_7 |
| KB_C | KB_PAGE_DOWN | KB_KP_8 |
| KB_D | KB_HOME | KB_KP_9 |
| KB_E | KB_END | KB_KP_0 |
| KB_F | KB_CAPS_LOCK | KB_KP_DECIMAL |
| KB_G | KB_SCROLL_LOCK | KB_KP_DIVIDE |
| KB_H | KB_NUM_LOCK | KB_KP_MULTIPLY |
| KB_I | KB_PRINT_SCREEN | KB_KP_SUBTRACT |
| KB_J | KB_PAUSE | KB_KP_ADD |
| KB_K | KB_F1 | KB_KP_ENTER |
| KB_L | KB_F2 | KB_KP_EQUAL |
| KB_M | KB_F3 | KB_LEFT_SHIFT |
| KB_N | KB_F4 | KB_LEFT_CONTROL |
| KB_O | KB_F5 | KB_LEFT_ALT |
| KB_P | KB_F6 | KB_LEFT_SUPER |
| KB_Q | KB_F7 | KB_RIGHT_SHIFT |
| KB_R | KB_F8 | KB_RIGHT_CONTROL |
| KB_S | KB_F9 | KB_RIGHT_ALT |
| KB_T | KB_F10 | KB_RIGHT_SUPER |
| KB_U | KB_F11 | KB_MENU |
key_clicked
if (keyboard.key_clicked(KB_ESCAPE)) {
	// do something.
}
if keyboard.key_clicked(KB_ESCAPE) then
-- do something.
endif keyboard.key_clicked(KB_ESCAPE):
# do something.bool result = input.key_clicked(int keycode)
Detect when a key on the keyboard is clicked. Which is detected by checking if the specified key was previously pressed, and was released since the last update call was made.
Input (Mouse)
get_position
const mp = mouse.get_position();
// mp.x
// mp.y
mp_x, mp_y = mouse.get_position()mp_x, mp_y = mouse.get_position()mixed result = mouse.get_position()
Get the x,y coordinates of the mouse cursor on the game canvas.
button_down
if (mouse.button_down(0)) {
	// do something.
}
if mouse.button_down(0) then
-- do something.
endif mouse.button_down(0):
# do something.bool result = mouse.button_down(int button_index)
Detect if a mouse button is pressed down. The available constants for button_index
are MOUSE_LEFT, MOUSE_RIGHT and MOUSE_MIDDLE.
button_clicked
if (mouse.button_clicked(MOUSE_LEFT)) {
	// do something.
}
if mouse.button_clicked(MOUSE_LEFT) then
-- do something.
endif mouse.button_clicked(MOUSE_LEFT):
# do something.bool result = mouse.button_clicked(int button_index)
Detect when a mouse button is clicked. Which is detected by checking if the specified button was previously pressed, and was released since the last update call was made.
Input (Gamepad)
get_axis
const mp = gamepad.get_axis(0);
// mp.x
// mp.y
gp_x, gp_y = gamepad.get_axis(0)gp_x, gp_y = gamepad.get_axis(0)mixed result = gamepad.get_axis(int gamepad_index)
When a gamepad is connected, this function returns the x and y direction of the (traditionally left) thumb stick. The values returned are either 1, 0 or -1 only. If 0 is returned, it means that the thumb stick is within the dead zone.
get_axis_raw
const mp = gamepad.get_axis_raw(0);
// mp.x
// mp.y
gp_x, gp_y = gamepad.get_axis_raw(0)gp_x, gp_y = gamepad.get_axis_raw(0)mixed result = gamepad.get_axis_raw(int gamepad_index)
When a gamepad is connected, this function returns the raw x and y direction of the (traditionally left) thumb stick. The values returned are set to a range between -32768 to -8000, 0 and 8000 to 32767. If 0 is returned, it means that the thumb stick is within the dead zone.
button_down
if (gamepad.button_down(0, 0)) {
	// do something.
}
if gamepad.button_down(0, 0) then
-- do something.
endif gamepad.button_down(0, 0):
# do something.bool result = gamepad.button_down(int gamepad_index, int button_index)
Detect if a specific gamepad's button is pressed down.
button_clicked
if (gamepad.button_clicked(0, 0)) {
	// do something.
}
if gamepad.button_clicked(0, 0) then
-- do something.
endif gamepad.button_clicked(0, 0):
# do something.bool result = gamepad.button_clicked(int gamepad_index, int button_index)
Detect if a specific gamepad's button has been clicked
Shaders
Most of the time you probably wont need to interfere with custom shaders. But if you decide to use them, having the ability to communicate info with them can become very important.
This section goes over how to send information to shaders. It's important to recognise that whilst the methods here are for interacting with GLSL (OpenGL shader language), when DirectX (HLSL) and other API support comes along, these will work for those as well.
shader.get_location
const var_loc = shader.get_location("my_variable");var_loc = shader.get_location("my_variable")var_loc = shader.get_location("my_variable")int result = shaders.get_location(string variable_name)
Gets the location id for a variable within the currently loaded shader. You need to call this if you are to use the methods below.
shader.set_bool
shader.set_bool(var_loc, true);shader.set_bool(var_loc, true)shader.set_bool(var_loc, true)shaders.set_bool(int location, bool value)
Send a boolean value to a variable on the currently loaded shader.
shader.set_int
shader.set_int(var_loc, 5);shader.set_int(var_loc, 5)shader.set_int(var_loc, 5)shaders.set_int(int location, int value)
Send an integer value to a variable on the currently loaded shader.
shader.set_float
shader.set_float(var_loc, 2.0);shader.set_float(var_loc, 2.0)shader.set_float(var_loc, 2.0)shaders.set_float(int location, float value)
Send a float value to a variable on the currently loaded shader.